I mentioned a few posts back that there was a great resource for
downloading OpenStreetMap data, and that it was relatively easy to
import osm data into PostgreSQL/PostGIS for use with pgRouting to
calculate shortest paths and various other network-based operations. In
this post, I’ll outline the steps required to get all this up and going,
and provide a quick example to show how this can be combined with QGIS
to visualise the computed shortest path directly.
Firstly, we need to install all the required packages. I’m assuming you
already have PostgreSQL and PostGIS installed, but if not, have a look
here for a quick guide to getting things set up (Note that the latest
version of PostgreSQL is now 8.4).
sudo apt-get install postgresql-server-dev-8.4 libboost-graph-dev
If you don’t have them already, you might also need tools for building the required software packages, as well as subversion and cmake.
sudo apt-get install build-essential subversion cmake
To be able to run the driving distance algorithms we need CGAL:
sudo apt-get install libcgal*
And the traveling sales person algorithm requires GAUL:
wget http://downloads.sourceforge.net/gaul/gaul-devel-0.1850-0.tar.gz
tar -xzf gaul-devel-0.1850-0.tar.gz cd gaul-devel-0.1850-0/
./configure --disable-slang
make
sudo make install
sudo ldconfig
Now it’s time to download, build, and install pgRouting. If you don’t
have subversion, or you don’t want to have the latest trunk version of
pgRouting, you can also download it manually.
svn checkout http://pgrouting.postlbs.org/svn/pgrouting/trunk pgrouting
cd pgrouting/
cmake -DWITH_TSP=ON -DWITH_DD=ON . make
sudo make install
Once we’ve got that installed and ready to go, we need to set up
PostgreSQL so that it ‘trusts’ local database connections.
sudo gedit /etc/postgresql/8.4/main/pg_hba.conf
Scroll to the bottom, and make sure you change the METHOD to ‘trust’.
# TYPE  DATABASE    USER        CIDR-ADDRESS          METHOD
local   all         all                               trust
And now that we’ve made these changes, we need to restart PostgreSQL
sudo /etc/init.d/postgresql-8.4 restart
Next we simply create a routing database to store our data in…
createdb -U postgres routing createlang -U postgres plpgsql routing
…add the PostGIS functions…
psql -U postgres -f /usr/share/postgresql/8.4/contrib/postgis-1.5/postgis.sql routing
psql -U postgres -f /usr/share/postgresql/8.4/contrib/postgis-1.5/spatial_ref_sys.sql routing
…add all the pgRouting functions…
psql -U postgres -f /usr/share/postlbs/routing_core.sql routing
psql -U postgres -f /usr/share/postlbs/routing_core_wrappers.sql routing
psql -U postgres -f /usr/share/postlbs/routing_topology.sql routing
…including the traveling salesman functions…
psql -U postgres -f /usr/share/postlbs/routing_tsp.sql routing
psql -U postgres -f /usr/share/postlbs/routing_tsp_wrappers.sql routing
…and finally the driving distance functions.
psql -U postgres -f /usr/share/postlbs/routing_dd.sql routing
psql -U postgres -f /usr/share/postlbs/routing_dd_wrappers.sql routing
We now have a fully working pgRouting database ready to be populated
with data! So in order to do that relatively painlessly, we first
install the osm2pgrouting tool, which will help us import our osm
data directly into our pgRouting database with the correct structure and everything.
svn checkout http://pgrouting.postlbs.org/svn/pgrouting/tools/osm2pgrouting/trunk osm2pgrouting
cd osm2pgrouting/
make
Once that’s finished building, we can go ahead and download our osm data from http://download.geofabrik.de/osm/. See this previous post for details. For this example, I’ll be using the osm data for Ireland
wget http://download.geofabrik.de/osm/europe/ireland.osm.bz2
bzip2 -d ireland.osm.bz2
Once we have that downloaded and extracted, we’re ready to import the
osm data into our database using the osm2pgrouting tool
./osm2pgrouting -file /home/cfarmer/Downloads/ireland.osm -conf mapconfig.xml -dbname routing -user postgres -clean
Once that is finished (could take a long time) we’re ready to query the network (Note that the values 52343 and 39219 represent network node ids)…
psql -U postgres routing
select * from shortest_path
    ('select gid as id,
        source::int4,
        target::int4,
        length::double precision as cost
        from ways',
    52343, 39219, false, false);
…to produce something like this:
vertex_id | edge_id |        cost
----------+---------+---------------------
    52343 |   78055 |   0.217641978736602
    52341 |   78052 |  0.0230665826613562
    52342 |   78053 |  0.0839311516838216
    20390 |   28717 |   0.166809293071158
    20389 |   28716 |   0.493120178133836
    20388 |   28715 |   0.271165901884914
    20387 |  112841 |   0.101669458767093
    14183 |   22893 |   0.106433172954507
...
Assuming your database is structured as pgRouting expects (which it
should be if you’ve used osm2pgrouting), you can use the some of the
functions which return geometries for use with other PostGIS functions:
select * from dijkstra_sp('ways', 52343, 39219);
id  |  gid   |          the_geom
----+--------+----------------------------
  1 |  78055 | 0105000020E610000001000...
  2 |  78052 | 0105000020E610000001000...
  3 |  78053 | 0105000020E610000001000...
  4 |  28717 | 0105000020E610000001000...
  5 |  28716 | 0105000020E610000001000...
  6 |  28715 | 0105000020E610000001000...
  7 | 112841 | 0105000020E610000001000...
  8 |  22893 | 0105000020E610000001000...
...
These queries are all fine and dandy, and can easily be used to
calculate the distances of shortest paths etc, but what I really want to
do is visualise this output in a GIS so I can get an idea of what these
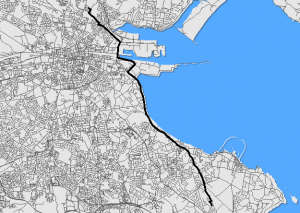
shortest paths looks like. In another previous post, I mentioned
how we could visualise spatial SQL queries directly in QGIS from both
the Python console, and using a handy plugin. We can do the same thing
here using pgRouting to produce a lovely spatial representation of our
shortest path query:
And there you go, a full fledged routing library built right into our database!

